Alfred Screengrabs WorkflowPosted on: September 28, 2013
In this post, I'll show you how to set up an Alfred workflow to take a picture of a portion of your screen, put it in your public Dropbox folder and give you a way to very quickly share it.
First of all, credit to @cheedear for inspiring me to do this during a chat at work recently and then credit also to a guy who goes by the name of Benzi whose existing workflow is what mine's based on. I decided to roll my own since his didn't fully suit my needs.
What we're setting out to achieve
There are 3 workflows that I was after (all of which should be triggered by a keyboard shortcut):
- Reveal (and select) the image in Finder (the one you see in action above). This is so that I can drag it into my twitter client or wherever doesn't support pasting the image itself from the clipboard.
- Copy the image itself to the clipboard.
- Copy the public facing DropBox link to the clipboard.
The super magic secret ingredient
Ok, so there's basically one terminal command that makes all the magic happen and it's called screencapture. This is what powers OSX's default image capture tool which I always thought was pretty good but was lacking the extras we're about to add.
If you take a look at the man page for the tool (go to your terminal of choice in OSX and type man screencapture), there are quite a few handy options you can use. As it is, I was only interested in -i for the interactive mode and -c for copying the image right to the clipboard, but you can just as easily modify the workflows to use any of the others you wish.
Creating the main workflow
I'm not going to go into excruciating detail about how to set up your own workflow with Alfred since the official site has a great introduction to them. Having said that, get started by creating a new blank workflow.
Now add a script action, and choose the /bin/bash language from the drop down, then paste the following snippet into it. I'll explain what's going on here below:
FOLDER=$(echo /Users/$(whoami)/Dropbox/Public/screengrabs)
FILENAME=$(date +%s).png
DROPBOX=https://dl.dropboxusercontent.com/u/2819415/screengrabs/$FILENAME
OPTION={query}

if [ $OPTION == "2" ]; then
	screencapture -i "$FOLDER/$FILENAME"
	open -R "$FOLDER/$FILENAME"
if [ $OPTION == "3" ]; then
	screencapture -ic "$FOLDER/$FILENAME"
	echo $DROPBOX | pbcopy
else
	screencapture -i "$FOLDER/$FILENAME"
	echo $DROPBOX | pbcopy
fi

[ -f "$FOLDER/$FILENAME" ] && echo $DROPBOX
So let's step through this bit by bit...
FOLDER=$(echo /Users/$(whoami)/Dropbox/Public/screengrabs)
FILENAME=$(date +%s).png
DROPBOX=https://dl.dropboxusercontent.com/u/2819415/screengrabs/$FILENAME
OPTION={query}
Here we're setting up a few variables (our config if you will).
FOLDERis where the screengrab will be saved to.FILENAMEis the name we'll give our file... I've chosen to just give it the current date represented in milliseconds.DROPBOXis the public url the image will be available at on DropBox. Note, you'll need to change the2819415here to your own user id. To get this, right click any file in your Dropbox/Public folder and select 'Copy Public Link'... you'll find it in that url.OPTIONis essentially a configuration variable that the script receives from whatever we put before this action.
Next up, our logic and the actual screencapturing.In a nutshell, this action can receive a 2 or a 3 as an input (I'll explain my reasoning for the numbers later) and will also have a fallback (the else - our default action if you will).
if [ $OPTION == "2" ]; then
	screencapture -i "$FOLDER/$FILENAME"
	open -R "$FOLDER/$FILENAME"
If it receives a 2, we'll use the interactive mode indicated by the screencapture -i bit. The next line opens Finder with the newly created file already selected - that's what the -R does.
if [ $OPTION == "3" ]; then
	screencapture -ic "$FOLDER/$FILENAME"
	echo $DROPBOX | pbcopy
If it receives a 3, we'll again use the interactive mode but this time we're passing an extra argument c which tells screencapture that we want to have the actual image copied to the clipboard. We then echo the DropBox url and pipe that into your clipboard with pbcopy... this is so that whatever comes after this action can use it (as you'll see next).
else
	screencapture -i "$FOLDER/$FILENAME"
	echo $DROPBOX | pbcopy
fi
The fallback or default action is to only use the interactive mode and echo the DropBox url.
Lastly, we simply call:
[ -f "$FOLDER/$FILENAME" ] && echo $DROPBOXThe first bit just tests whether the file exists (no need to pass anything on if you decided to cancel the screengrab) and if it does, it passes the url on to whichever output we choose in the workflow.
Keyboard shortcuts FTW
So we've set up this lovely script... now what? Well, let's hook it up to some keyboard shortcuts.
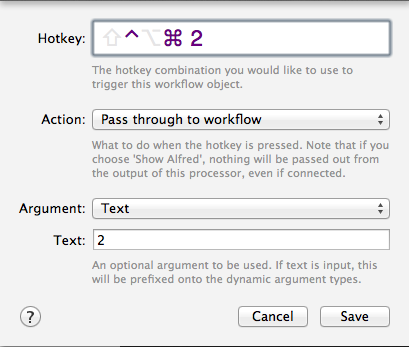
In your workflow area, click the + on the top right and choose Triggers -> Hotkey, you can then configure it to whichever hotkey you prefer, but as you can see below, I chose Cmd+Ctrl+2. You'll also see that I'm passing a text argument and it's the number 2. This is why I chose the number I did - so they match up to the hotkey I have set up †.
Now simply do the same thing for Cmd+Ctrl+3 (passing the number 3 as a text argument), and Cmd+Ctrl+4 (with no argument - this is our default action in the script). Hook them up to the action script and you should be ready to go!
† The reason I started with 2 is just because 1 is a bit awkward to reach.
Finishing touch
The last thing I thought would be a nice touch is to get told/notified that something's just happened so we're going to create a notification with the url.
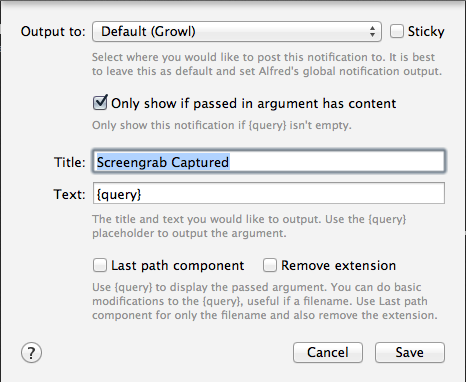
Click the plus at the top right again and choose Outputs -> Post Notification. As you can see below, I happen to prefer Growl but you can use the default notification center if you don't have Growl. Also notice that I've put {query} in the text field. Remember earlier where I said we were echoing out the url for whichever output we choose? Well this is where it goes.
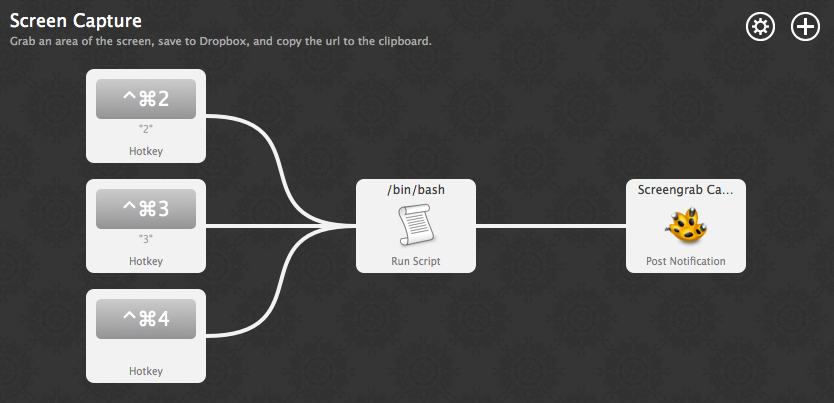
The completed workflow
So hopefully that's all worked for you and if you're a tad OCD like I am, then your workflow should end up looking something like this:
Happy screen grabbing!